Mid-Side Mic Technique: Unlock Pro Stereo Recording

Mid-Side recording (MS recording) is a versatile stereo mic technique that offers precise control over your stereo width and ambience while maintaining mono compatibility. This blog will explore the mid-size mic technique, its ideal applications, and how to set up the MS Matrix in your DAW.
What Is Mid-Side Recording?
The Mid mic, typically a cardioid polar pattern (but a figure-8 pattern is also acceptable), provides a direct, clear sound from the front of the source, allowing you to capture the detail and intimacy of the sound.
The Side mic, specifically using a figure-8 polar pattern, picks up ambient sound from the left and right side channels, adding fullness and a sense of space that enhances the overall stereo image.
Why Should I Use Mid-Side Recording?
Two main benefits of using MS recording are the advantage of adjustable stereo width and mono capability.
-
Adjustable Stereo Width: In post-production, you can emphasize the stereo width or narrow the field depending on the context of your mix. This versatility makes MS an excellent choice for recording scenarios, from solo instruments to small ensembles. This control may also be helpful while transitioning between various song sections, such as the verse and chorus, as it allows you to adapt the spatial quality of the audio to suit the emotional dynamics of each part.
-
Perfect Mono Compatibility: Many overlook the importance of checking mono in their recordings and mixes. However, it remains a critical format used across various applications, from smaller devices like portable Bluetooth speakers to larger systems such as overhead speakers in retail environments. The beauty of Mid-Side recording lies in its flawless mono compatibility, which ensures that your audio retains its integrity across different playback systems. How it achieves this will become evident when we explore how to set up the Mid-Side Matrix.
Setting Up A Mid-Side Matrix in Your DAW
You can achieve an MS Matrix within your Digital Audio Workstation (DAW) in several ways. The method shown in this blog is the preferred method that demonstrates the signal flow quite well, but there are other methods you can search for.
I use ProTools on a PC, but the concepts will apply to any DAW you can access. If you are on a Mac, please replace Ctrl with Cmd.
Step 1: Microphone Placement
Set up your two microphones:
- The mid mic: Use a cardioid or figure-8 mic, like the AKG C451B, pointed directly at your sound source.
- The Side mic: Use a figure-8 mic like the Audio Technica AT4050 placed perpendicular to the Mid mic (so it captures sound from the left and right sides).
- Place the two mic capsules as close as possible and bisect each other, forming a plus sign (+) if viewed from above—this ensures perfect phase alignment, which is extremely important in stereo recordings. [See Figure A]
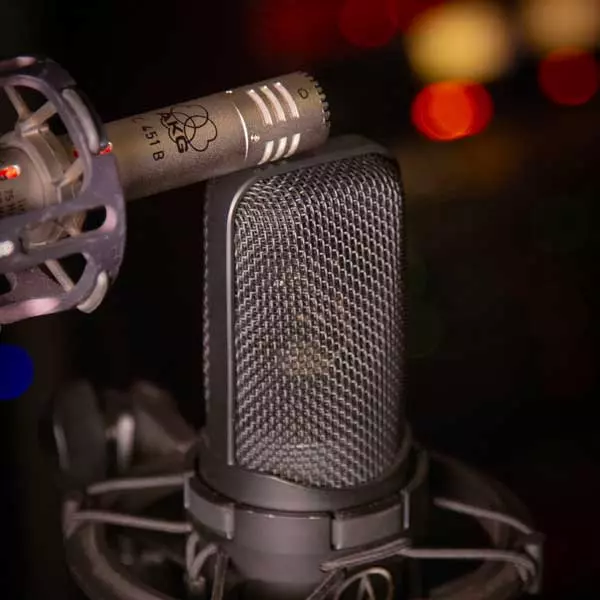
Figure A: MS Mic Placement - AKG C451B as the Mid and Audio Technica 4050 set to figure-8 as the Side.
Step 2: Create & Name Your Tracks
Create (Ctrl+Shift+N) one mono audio track, two mono aux tracks and one stereo audio track—the first for the Mid mic and the rest for the Side mic. [See Figure B]
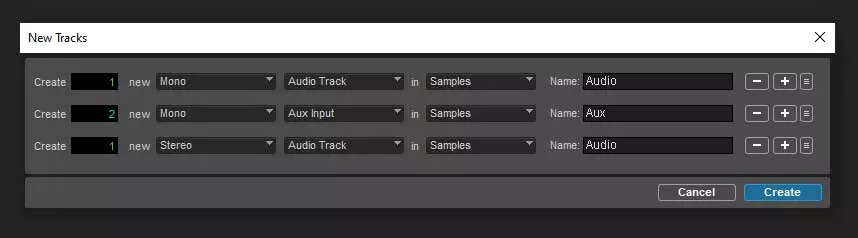
Figure B: ProTools New Track Dialog Box - Required Tracks.
- Mono Audio: Mid mic (center).
- Mono Aux 1: Side mic (left).
- Mono Aux 2: Side mic (right).
- Stereo Audio: Recording the output of the two side aux tracks, creating your final stereo side track.
|
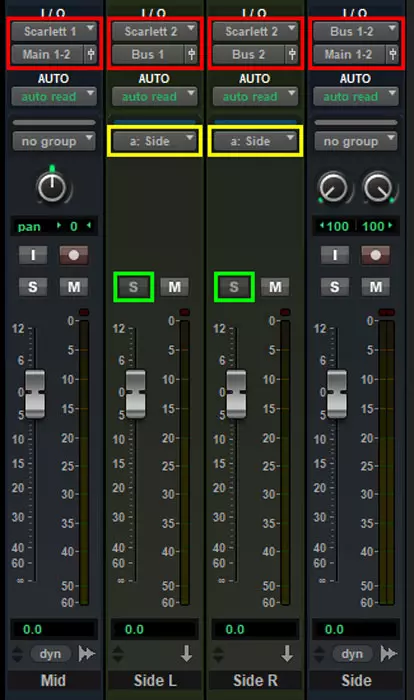
Figure C: MS Track Setup in ProTools: Red - Input/Output; Yellow - Grouping; Green - Solo Safe Mode Enabled. |
*ProTools Tip: Use Ctrl+Plus/Minus to add/remove tracks in the New Track Dialog; Ctrl+Left/Right Arrow to switch between mono/stereo; and Ctrl+Up/Down Arrow to change between track types (audio, aux, instrument, master, etc.).
Group (Ctrl+G) your two Aux tracks so their faders move together—should you need to adjust their level, this maintains the stereo image. However, in most cases, you would change the Stereo Audio fader instead of the group Aux tracks to maintain the proper gain staging. [See Figure C - Yellow]
*ProTools Tip: Alt+Click any fader (or fader group) to return it to 0.
Name your tracks accordingly for your particular session, e.g. Acstc Mid, Acstc MS L, Acstc MS R, and Acstc Side. I have used generic names in this example.
*ProTools Tip: Use Ctrl+Right/Left Arrow to select the next/previous tracks while in the Track Name Dialog (instead of double-clicking the name of each). |
Step 3: Set Up Your Routing
Next, select your input and output routing for these new tracks within your DAW. [See Figure C - Red]
Make sure the two Aux tracks are set to Solo Safe mode (indicated by a greyed-out 'S'). You can enable or disable this mode by Ctrl+Clicking the 'S' button. Solo Safe lets audio pass through these Aux tracks without affecting any solo buttons in your session.
In newer versions of Pro Tools, Solo Safe is typically the default setting for new Aux tracks. Still, previously, it was necessary to set this manually for effects like reverbs, delays, and submixes. [See Figure C - Green]
- Mid (Mono Audio):
Input: Mic 1
Output: Main 1-2 - Side L (Mono Aux):
Input: Mic 2
Output: Bus 1 - Side R (Mono Aux):
Input: Mic 2
Output: Bus 2 - Side (Stereo Audio):
Input: Bus 1-2
Output: Main 1-2
Step 4: Invert the Phase
Now, invert the phase of ONE of the Side (Aux) tracks, such as Side R (Aux).
Unfortunately, ProTools still does not have a phase invert switch per channel—your DAW may, and if that’s the case, simply use that. You can do this in ProTools by adding the Trim, EQIII 1-Band plugin or Avid Channel Strip and hitting the phase invert button. [See Figure D]

Figure D: 3 Different Plugin Options for Phase Inverting Tracks in ProTools: Left - Channel Strip; Top Right - EQ3 1-Band; Bottom Right - Trim.
This phase inversion not only creates the final stereo effect but also ensures flawless mono compatibility. Because the left and right Side tracks are phase-inverted relative to each other, collapsing them to mono results in their complete cancellation, leaving only the signal from the Mid microphone.
Congrats! Your MS matrix is ready—now let’s go forth and conquer the sound waves!
Step 5: Let’s Record & Check Phase
Record Enable, both of your Mid and Side audio tracks, then hit record!
Record a couple of staccato notes or short phrases to check the phase. Stop recording, then go back and zoom in (Alt+Scroll) on both your Mid and Side audio tracks. Ensure both tracks are aligned. [See Figure E]
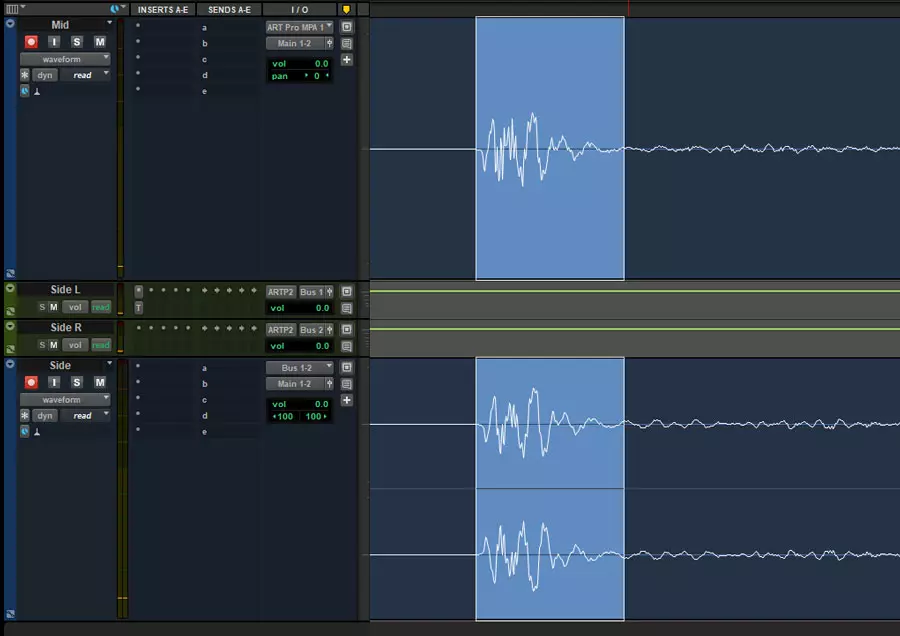
Figure E: Properly Capsule Aligned Tracks (Zoomed In)
If the tracks are not aligned, adjust your microphone placement as the capsules are not aligned. Remember, if viewed from above, the two mic capsules should be placed as close as possible and bisect each other, forming a plus sign (+). [See Figure A]
Step 6: Balance the Levels
Finally, adjust the balance between your Mid and Side faders in your DAW.
To get the full direct mid mic sound that is supported by the rich ambiance of the side mic, try this as an example:
- Bring up your Mid mic preamp level and set your Mid fader to around -5 or -10.
- Bring up your Side mic preamp level and then drop your Side audio track fader to negative infinity (to the bottom).
- Slowly bring up the Side audio track fader, listening to the balance of the Mid Side until you achieve the balance and overall sound you desire.
General Rules:
- Lower the Side audio track for a tighter, more mono sound.
- Lower the Mid audio track for a broader, more ambient stereo image.
Automating these levels allows dynamic adjustment of the width throughout the track.
Practical Applications
MS recording is a favourite for acoustic instruments and small ensembles. It excels at creating a natural, immersive sound. While this is usually a positive, it could become a negative if you are recording in an acoustically inferior space, as it inherently picks up the room sound. Please keep that in mind.
Below are a few ideas for using Mid-Side stereo recording, but you should experiment! Decide for yourself what this technique sounds good on.
- Acoustic Guitar
- Piano
- Strings (Violin, Cello, etc)
- Brass (Trumpet, Trombone, etc)
- Percussion (Drums, Congas, etc)
- Vocals (Background or Group Vocals)
- Wind Instruments (Saxophone, Flute, etc)
- Room Ambience
Now that you know the mid-side technique with the manual MS Matrix setup, look at the ART Pro MPA-II, a great entry-level tube preamp for adding warmth to your Scarlett or Volt!
Just engage the MS Matrix on the front panel: Channel 1 will control your Mid mic, and Channel 2 will control your Side mic. Send this folded-down MS signal to a stereo track in your DAW. Done!
Now, you can bring MS recording's clarity, control, and unique stereo depth to your next session.