resized.webp "The Traditional Tonewoods of Electric Bass")


How to Record Great Bass Sound at Home

Recording your bass tone just as you want can be a fun but tricky process in a professional recording studio – and it can be even more challenging at home.
While most professional studios offer high-quality equipment and a well-trained engineer at your disposal, home recordings provide flexibility, comfort, time and control. Home recording sessions are all about getting the best possible results out of the gear and recording knowledge you have.
This blog will give recording techniques on how to record bass during your home recording session and make it sound great.
Step 1: Set Up Your Bass
First, ensure your bass guitar is tuned and in good working order. A fresh set of strings can go a long way for a clear, bright tone. Musicians favour older strings for a warmer, more subdued sound. Old strings can throw off your instrument’s intonation, so check your tuning up the fretboard.
If you have problems with your bass guitar and don't know how to fix them, such as replacing or changing your strings, take it to a Long & McQuade store. They can check it and set it up for you.
Step 2: Preparing Your Recording Equipment
The next step is to set up your recording equipment. Proper equipment setup will significantly enhance the success of your music production sessions. Let's set up the recording interface.
Home recordings typically use a USB audio interface such as the Universal Audio Volt 2 USB Interface or a standalone multitrack recorder such as the PreSonus StudioLive AR8c 8-Channel USB Hybrid Performance/Recording Mixer, which has both capabilities. This article will focus on using a USB recording interface, which is the more common option today.
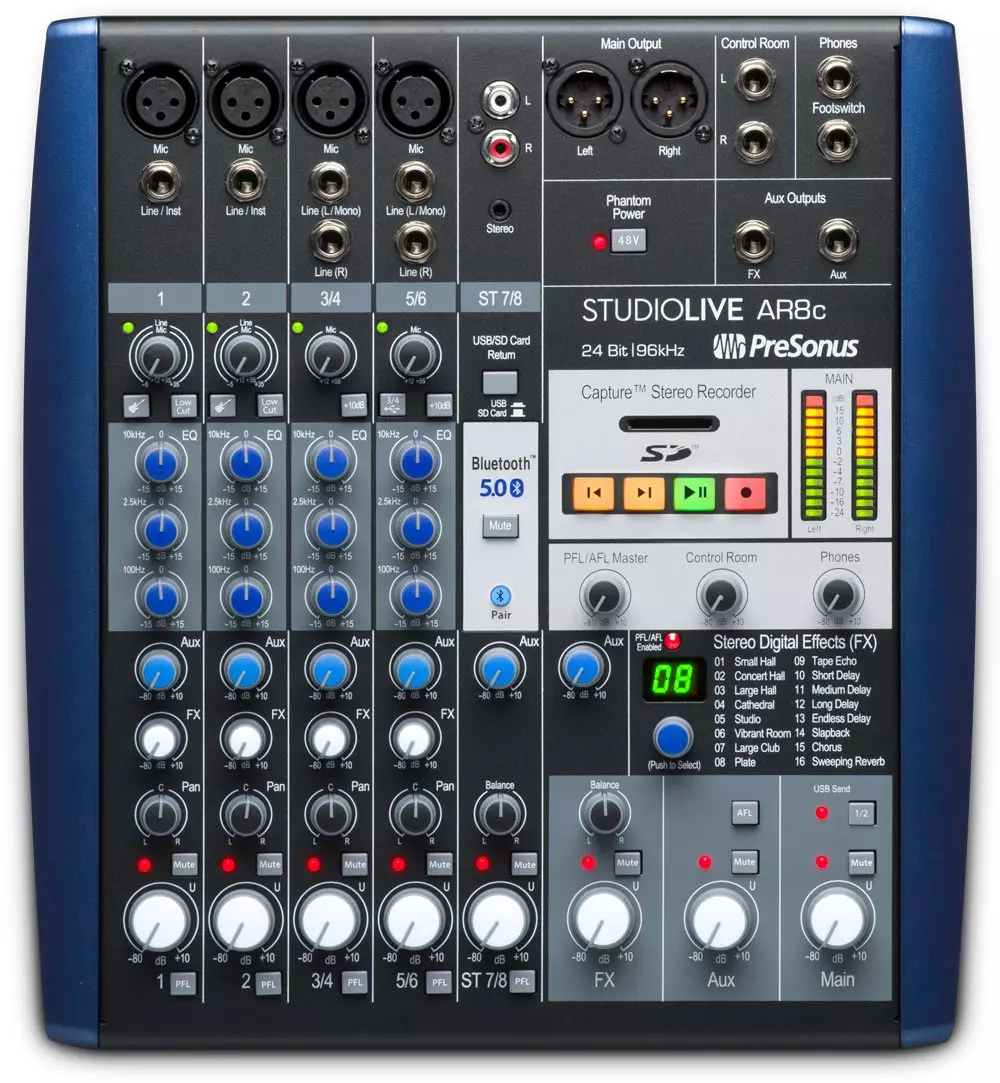
PreSonus StudioLive AR8c 8-Channel USB Hybrid Performance/Recording Mixer
Many instruments record best with a microphone. The most common type of microphone used to record instruments is a condenser microphone. Condenser mics are the best option for capturing the clearest and most detailed sound possible from acoustic instruments. They also give the best tone when trying to capture the sound of an electric guitar or bass amplifier.
Today, recording with a microphone is the most common practice in many recording studios. While it’s still a great way to capture sound, modern emulation software and "Impulse Response" or speaker simulation technology have allowed direct signals to be manipulated to sound like they're being recorded the same way.
Universal Audio offers many of these products through their Spark service, which does not require a specific audio interface to use, though there are many options to choose from.
When recording electric bass, you don't need to mic an amp up - a direct signal is usable and preferred in many cases. However, suppose you have an amplifier, such as an Ashdown Studio 12 Combo, and a microphone, such as a Shure SM57 Unidirectional Dynamic Microphone, as well as a living space with an acceptable degree of amplified volume.
In this case, I'd recommend setting that up and getting a mic'd signal path. Experiment with the placement of the microphone to the speaker cone. Many articles online can assist you in this process.

Sennheiser E 914 Polarized Cardioid Condenser Microphone
To give yourself flexibility, use a DI box and send the balanced XLR out directly into one of the inputs on your interface. The 1/4" THRU output will be sent into another input. This gives you two workable signals - one can be dry, and the other can be processed as you like (i.e. through an amplifier that you've mic'd up or through your favourite pedals and then fed back into the interface).
The Tech 21 SansAmp Bass Driver DI Box is a handy bass amp for every home recording session. It has three outputs: an XLR and two 1/4" outputs. One is completely dry, and the other is affected by the pedal's pre-amp.
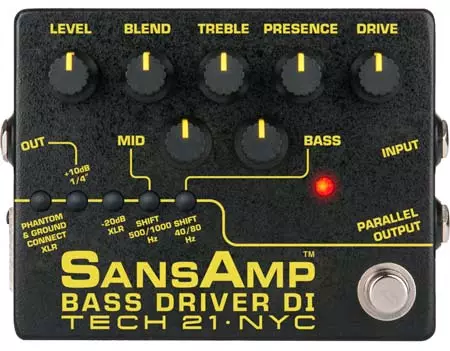
Tech 21 SansAmp Bass Driver DI Box
For additional options, you can use one signal path as dry (parallel output), one as wet (XLR output), and a third one to send to your favourite pedals or amplifier, which then gets mic'd up (1/4" output).
You will want at least one completely dry signal path if you don't have the appropriate gear to get multiple signal paths. Plug your bass into a channel and arm multiple tracks in your DAW to the same input channel on your interface. Effects, EQ, and amp/speaker emulation can be applied or removed separately to each track.
Rule of thumb - A dry, well-performed take is always the easiest to work with.
Step 3: Recording Your Tracks
Now that your gear is set and your multiple tracks are armed, label them in your digital audio workstation (DAW) accordingly (i.e. Track 1 is BASS DRY, Track 2 is BASS WET, Track 3 is BASS PEDALS). These are all recorded simultaneously.
When you finish a take, you will have multiple tracks of the same performance, all having different characteristics. You can choose one and mute the others or blend them to taste. Using effects before you hit the interface is limiting because you can't remove the effects once recorded, so you’ll want to have a separate dry pathway. You may only use the signal path with your favourite pedals, which is excellent, but having options is key.
You also have the option to use software to apply effects to your dry track after it's been recorded. This is nice because you can change and add/remove them at your leisure until you've found what you like, though sometimes a pedal does the job more effectively. Again, giving yourself many options is the best approach.
Step 4: Gain Staging
At this stage, before you hit record, you want to make sure you've "gain staged" correctly. If you've ever recorded something and thought, "Why does this sound so thin and lifeless?" there's likely an issue with gain somewhere in the chain. If you record an instrument and the gain isn't set correctly, it may sound thin, weak, distorted, and gnarly (and not in a good way).
Gain staging follows a simple rule - If your device has an LED indicator or a VU meter with a green and red indicator light for each track, like the UA Volt 2, follow that. You want your signal to be in the green, entering orange when playing at your highest point of attack. If it is entering red or "clipping," you need to turn the gain down. If it is all green and the signal seems thin or weak, you need to turn the gain up.
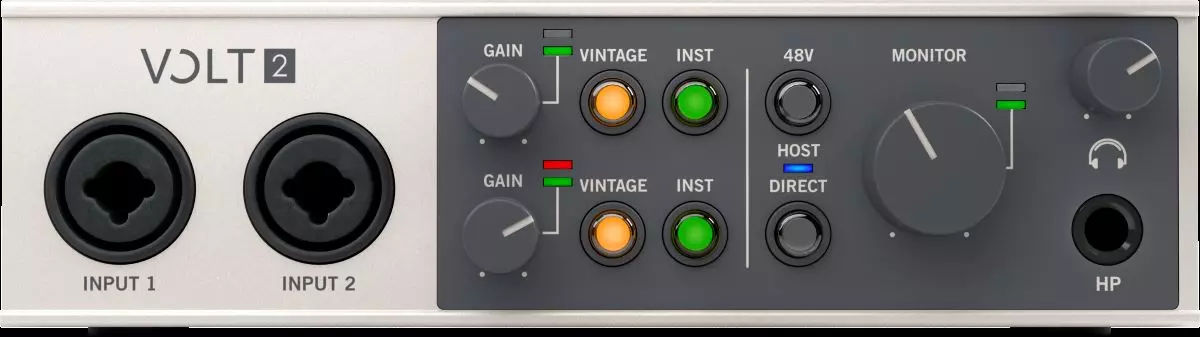
Universal Audio Volt 2 USB Interface
Suppose you have an active bass (i.e., a pre-amplifier built into it that requires its own power source, usually a 9v battery). In this case, you'll want to be mindful of whether your interface has a "Hi-Z" or instrument-level input and, if selectable, whether or not that feature is engaged.
This will affect the gain structure by boosting the preamp gain on your interface - and you'll generally want to have this engaged on any completely dry, non-active bass signal. Active basses won't require this boost, as the bass already has a pre-amp built in.
This means you would likely give the input too much gain, and it will clip easily. The best approach is always to have the volume knob on your bass up, turn up the gain until you find the limit/peak, then turn it down accordingly. You generally want to record your parts with a consistent attack on the bass, so you should be able to find that green-to-orange area that works for you and your bass.
One more note on active basses - Be careful not to turn up all the EQ knobs all the way. These types of controls usually have a center detent (the knob will click into place at the halfway point).
It should stay there, only to be adjusted after you've gain staged and only if necessary to achieve the desired tone. You can do a lot of EQ shaping in your DAW, and generally speaking, the best dry take will involve as little processing as possible, including on your instrument.
An essential part of recording is minimizing the "noise floor" of any signal path, including signal interference from other sources and possible wiring or shielding issues your bass might have. Increasing gain will inevitably increase the noise floor to some degree. If you're noticing any hiss, hum, or buzzing sound, it might be time to take your bass to a local Long & McQuade for a service check.
Pro tip: If you're using a bass with single-coil pickups (i.e., a Fender Jazz Bass) and you choose only to turn one of the pickups on (this shouldn't happen if both pickups are at 100% volume), then you might be hearing "60-cycle hum" - this is a known side effect of single-coil pickups. The hum could be from an inadequate power supply, a "ground loop hum," or electrical interference from another source. Troubleshooting this can be one of the tedious but necessary steps to recording.

Fender Player II Jazz Bass, Maple Fingerboard - Black
Step 5: Time to Record Your Magic
You now have the tools to get a great recorded bass sound! Press record, get your take, and then hear the mix back with each separate track or with any combination of them.
One final tip: If you edit your takes and use multiple tracks, ensure you edit them all similarly to avoid phase and alignment issues. After you have finished the takes, you can send them to the recording engineer as one pre-mixed signal or as separate files, giving them plenty of options.
That's all the information you need to start recording high-quality tracks! Time to make some low-end noise with your bass!