NAMM 2016: New Controllers and Turntables for DJs
Denon DJ MCX8000 DJ System
TEXT OF VIDEO:
Hey, it's Jason from Denon DJ. I'm here with Long & McQuade and we're looking at the Denon DJ MCX8000. The MCX8000 is our brand new, stand alone professional DJ player for Engine USB and Serato DJ.
What's great about the 8000 is it supports both Serato DJ and Engine USB playback at the same time, so I could have one deck completely stand alone with USB and the other could be a Serato DJ control deck. This is great for DJ hand-offs, and also just having a USB backup or even taking the controller without a computer to a party and just using the USB device. That is a really cool feature. The fact that you can go between both of them seamlessly, this is the first time.
The 8000 features a high resolution colour display. We can set hot cues and they are also coloured indicators on the wave form, and they match the performance pads. There's lots of buttons here for browsing and navigating through your tracks and preparing music. We also have dedicated on-board effects for when used with USB. We have the echo, a phaser and a noise build-up. These effects are also available when it's used in line mode, so if you are using it with a turntable or a media player, you can also use these effects with that input source.
It's simple to switch between sources, as you can see on the channel strip. I am on channel one. I can go from PC, so if I had my computer connected here, you would see the Serato display, and I can look at Engine, the stand alone USB, or my line input.
Going down the deck here, when used with Engine and Serato, we've got our effects. We've got a needle drop for touch strip for searching quickly through the track. We've got a 5-1/2 inch touch capacitive platter with an LED ring for tracking your position. A long throw 100mm fader. Pitch bend buttons, an auto loop and manual looping section, and then over here are our performance pads, which are velocity sensitive. With Engine we have cue, rolls and a four beat auto slicer. When you use the performance pads with Serato DJ, that opens up more features, so you can have control over slicer, sampler, velocity sampler and even a brand new key performance pad mode, which is exclusive to the 8000 right now.
We also have over to the right our transport controls, beat grid buttons, vinyl and then deck layering. We're on deck one. We can now go to deck three and switch the layer.
That's kind of an overview of the deck controls. Let's take a look at the mixer on the 8000. You notice that we have a large amount of room here to mix. It's very comfortable. It's a spacious layout. We have control over four audio sources with a level and 3-band EQ on each channel strip, as well as an on-board, dedicated hardware filter. Cue assignments for your headphone, and then a left/right assignment for your cross-fader.
On the left of the mixer, we feature microphone inputs for mic 1 and mic 2, with an echo amount, and the echo can be applied to either mic 1 or mic 2, or both. You can also turn off the microphones by pressing the "mic on" button. We feature the talk-over, which ducks the music below your voice when you're speaking, and then a post, which takes your voice out of the booth monitor.
To the right of the mixer, we have our master control. Below that are the booth, booth level and a dual band EQ for adjusting your booth. Sometimes you'll be set up in a club or a bar and the PA in the bar just isn't cutting it, so you might want to tweak that sound a little bit with the booth EQ, which is a nice feature.
Below that is our sampler volume, the cross-fader link for Serato DJ and then some headphone cueing. The right deck is pretty much mirrored of what we saw on deck 1 for decks 2 and 4.
Let's take a look at the rear panel. I'll show you some of the i/o on the MCX8000. Starting from the left here, we've got our power switch; power input; a high retention USB 2.0 port; a USB hub to PC, so this will free up the port used by the MCX8000, giving you additional input for an external hard drive or an additional controller. We've got balance XLR booth outputs, balance XLR master, a stereo to mono switch, unbalanced output for our master, and the 4 line level inputs for external devices, with lines 3 and 4 can be switched to phono and line, so you can use those with DVS and Serato DJ. Mic 2 and Mic 1 input; mic 2 is a quarter inch and mic 1 is a combination, so it accepts XLR and quarter inch. A Kensington lock slot, and a stage link Ethernet connection there. What that will do is that sends all of the information played from the MCX8000, including your active state, active deck, your tempo and pitch adjustments and that sends it to a video rig and it will trigger lighting, pyrotechnics and all kinds of video.
Thanks for stopping by and checking out the MCX8000. It will be available in a few months.
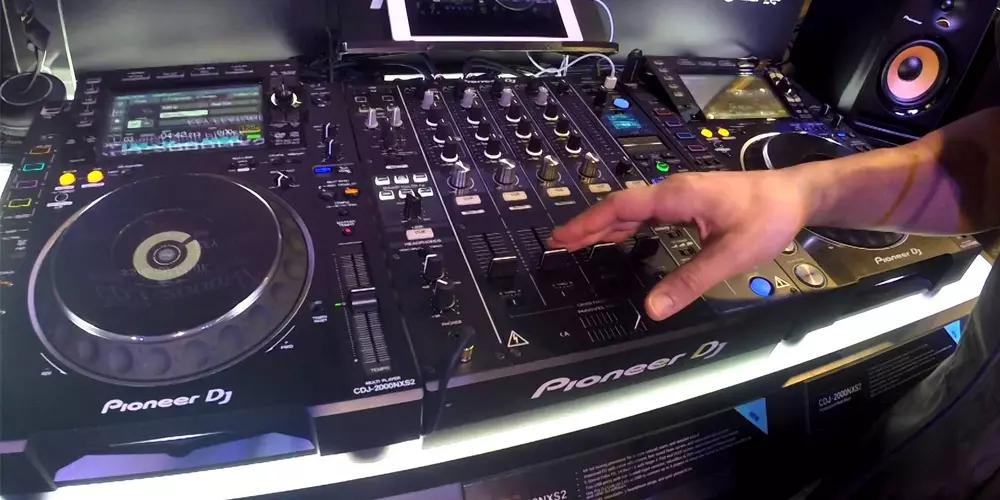
Pioneer DJ Nexus 2 System
TEXT OF VIDEO:
Hey guys, my name is Mark Gallo with Pioneer and we're here at the NAMM Show 2016 and I'm going to give you a quick rundown of our Nexus 2 System.
We'll start here with our CDJ. We'll start here with our four hot cue buttons as opposed to three on our previous models. We now have two banks of four, so we now have a total of eight hot cues that you can colour coordinate in Rekordbox. The way you record them is actually different now as well. We'll delete these. You can one-touch record, one-touch play back. One-touch record, one-touch play back and to delete, hold that button and tap. You don't have to enter and exit out of record mode.
We added a slip reverse knob which is a momentary switch as opposed to our regular reverse which will lock you in reverse mode. This is a momentary slip reverse, hold it and let it go. We're going to move up here to our full colour seven inch touch screen. Which is ... You can actually ... This is our new phase meter here. You can toggle back and forth from our old phase meter to our new phase meter. We have a one beat jump button which allows you to jump forward or backward one beat. You can enter loop mode here which lets you to enter and exit loops, change the size of them. In slip mode, this actually acts as a loop roll so you can do cool little stutter effects.
Our little shortcut button here, which I like to call "the magic button" brings you to this screen here which lets you access a lot of the cool new features, again you can toggle back and forth between our old and new phase meter. Here you can adjust your hot cue auto load settings. You can also now adjust your quantize beat value, before it was a steady one beat and now you can actually adjust it from one beat to a quarter beat, I'm sorry, one beat, half beat, quarter beat or eighth beat.
You can toggle back and forth between blue and RGB waveforms. We have a full QWERTY keyboard search. One really cool thing for digging deep into your track, your music collection to select the proper track is something we call track filter. This allows you to filter out tracks according to criteria. Here for example, we're going to engage our filter to show us tracks that are plus or minus, within plus or minus 5% of 125 bpm in the key of C or related, three stars, two stars, four stars and let's say pink, orange and purple colour. You can tag your tracks accordingly in Rekordbox allowing you to filter down and get really specific.
You can also access our My Tag feature here, which allows you to even further dig through your collection. You can access components of your tracks like synth, sub-bass, dark, you can vocal, piano, anything like that. You can even go by situation, build-up, after hours, peak time, warm up tracks, pool party, anything like that. Festival set. So you can really dig deep through your collection to find the appropriate track that you're looking for.
Let's move on to our mixer, you're going to notice we have two sound cards here for a smooth transition from one DJ to another or perfect for tag-team sets or back-to-back sets. Moving on down here, we brought back our sweep sound colour effects and our parameter knob is something new, which now allows you to even further customize those sound colour effects. Our sound colour effects knob on each channel are now larger giving you a much better feel, much better grip for better control.
We added a phono input to each channel, so now no matter what your configuration or line input's or phono inputs or turntables, you can actually set them up either way, any way you prefer and have the proper input on each channel. We adjusted our crossover point on our low EQ knob. We brought it lower so when you cut it out, you're cutting less of the mid, so you can really isolate vocals this way.
Moving down here you'll see our beat effects lights. Now what this does, it shows you which channel you have selected, it was a little more difficult before, you had to look up here in the right hand corner, but now it's really easy to find out which channel your effects are being routed to. If you want to route your effects to more than one channel, you can just assign them to either of the cross fader channels and then on your beat effects selector you just choose that cross fader and you can effect all of those channels at the same time.
One thing you'll notice here, in our beat effects section, is we added a ping pong effect, which is a ping pong delay. We brought back our pitch effect, added a vinyl break and this really cool helix effect which you can see James demonstrate wonderfully in our product launch video on PioneerDJ.com. I wouldn't even do it justice if I tried to imitate it.
One really cool feature we took from our EFX line and our DJM2000 is our effects frequency selector buttons. This enables you to choose which frequency your beat effects will be assigned to, so for example if you're using a ping pong delay or a reverb, you probably don't want to effect the low end so you're just going to deselect the lows and you'll have a really cool sounding effect on just your lows and your highs.
Moving on up here, we've doubled the size of our X pad allowing you to more easily and accurately jump between timing of your beat effects and we completely separated the send and return. Before we had a send and return in our beat effects section meaning you couldn't use both at the same time, you could either use send and return or you could use beat effects. Now you can use both at the same time, and we added an industry first digital send and return in addition to our traditional 1/4-in jack send and returns.
What this enables you to do is send and return via this USB to lightning cable in our RMX1000 app. You're not just limited to our app, you can use any type of app. Let's say it was a guitar pedal app or a finger drumming application, you can use any iOS app that will send audio output through the lightning port as our digital send and return.
One thing I can't demonstrate for you is the sound quality of this entire system. It inputs and outputs full 96k 24-bit via S/PDIF connection so it's a really warm sounding, warm, full, clear sounding mixer that we really went above and beyond for a digital mixer. We really went for that analog-type sound and we think you guys are going to be really impressed with it.
Denon VL12
TEXT OF VIDEO:
Hey, guys. It's Jason again with Denon DJ. I'm here with Long and McQuade at NAMM 2016, and Here I'm going to show you our brand new turntable, the VL12. The VL12 is a brand new design from the ground up, and this is for the professional DJ. What you're looking at here is our brand new turntable line, and you notice that it's got a very nice, thin profile, kind of a futuristic design, so it's not your traditional OEM turntable that you're looking at. We chose to go with an all matte black finish. Also what you'll notice that's very different about this kit is that you're seeing the platter is glowing right now. We feature a RGB LED kit around the platter ring, as well as a strobe light.
On the front of the device, there's actually controls for brightness and colour. If I turn the brightness all the way up, we're getting a white. I turn it down, and now we can adjust the colours, so we can see purples, pinks, reds. We can pretty much get a wide range, and pretty much any colour you desire, you can set it there. That also changes the colour of the strobe light. Also on the front of the device ... I keep saying the front. We angle this in the battle style, so the battle style position. This is our front, and it features a low and a high torque setting, a brightness control for your RGB platter ring.
On the top of the device, it's pretty much your standard turntable features, so we've got a motor on and off switch, a start and stop button, 33 and 45 RPM speeds, we have a removal needle track indicator LED. Then a 100 mm fader with a quartz lock reset, and then three ranges between plus or minus 8, plus or minus 16, and plus or minus 50.
The VL12 features an all-metal construction tone arm, and on our rear we have a phono output with ground.
Numark Dashboard for Serato
TEXT OF VIDEO:
Brennan here at NAMM 2016. showing the new Numark Dashboard. We came out with a Numark NV. We then came out with the NS7 Mark 3 and both of these products introduced Serato’s screen technology directly into our product. We wanted to allow you to use this with other brands and so we came out with the Dashboard.
With the Dashboard, it goes from your controller to the Dashboard to your computer and then that runs Serato inside of it and allows you to have your track listings, your track views and really get you away from the computer. It's going to be available really soon.

